
Building an Academic Website
Published:
If you’re an academic, you need a website. Obviously I agree with this since you’re reading this on my website, but if you don’t have one, you should get one. Most universities these days provide a free option, usually powered by WordPress (both WashU and UNC use WordPress for their respective offerings). While these sites are quick to set up and come with the prestige of a .edu URL, they have several drawbacks that have been extensively written on. If you’re a junior scholar, having your own personal webpage is even more important:
- If (when) you move institutions, you’ll lose your website
- Even if you can export the contents of a WordPress site, there’s no guarantee it will seamlessly integrate with another university’s implementation
- Even worse, you’ll lose your search engine ranking since you’ll be starting over from square one with a new URL
Even if you stay at the same institution for the rest of your career, you’re at the mercy of IT and your site may be taken down by a change to the hosting platform at some point in the future.
My approach
There are plenty of guides out there on how to create a personal website using tools like WordPress, Wix, or Google Sites. The free versions of these tools often come with ads, or at the least a message telling you which tool was used to create the website. I take a different approach that requires some (minimal) coding experience, but produces a beautiful and professional website that is ad free. I use a static site generator that produces HTML from easy to edit Markdown files. Because the resulting site is static (it’s just a collection of files with no interactivity where users can .e.g, fill out and submit forms) it can be hosted for free with GitHub Pages. Steven Miller has a nice rundown on all of the advantages of this approach.
Who this guide is for
This guide is intended for someone with a basic level of coding experience and comfort with Markdown files. Anyone who’s received graduate training in quantitative social science in the past few years should have all the necessary skills. I’m assuming some familiarity with using the terminal, but no experience with Git or GitHub is needed.
There are other guides to using static site generators to make academic websites, but they all assume a very high level of experience with the required tools and the ability to conduct extensive troubleshooting on your own. The template I use contains a 6 point checklist with no illustrations or examples. I’ve written this guide for people who have some experience coding, but don’t want to spend an afternoon learning two new languages on their own. If you know how to use R Markdown you have all the skills you need to build a website.
Conventions
In this tutorial, I use a couple of conventions to describe computer code and the actions you’ll do with it. Anytime you see content between two angle brackets, you should replace the content with the appropriate version for yourself. For example, <yourusername> would become jayrobwilliams for me, because that is my GitHub username. You’ll also frequently see
highlighted code blocks like this
with this icon in the top right corner. These can denote either code you should enter and run, or the output of running a command. I will clearly state which of these options applies in any given case. Sometimes you will also see inline code like this, and again I’ll note whether these represent code you should run, or the output of code.
A brief aside on Git-speak: these periodic indented blocks will explain the terminology that Git uses to help you understand what each Git command actually does.
Getting started
Two of the most popular programs available for building static sites from Markdown files are Jekyll and Hugo. Relevant for us is that each one has a full-featured theme for academic websites that you’ve probably seen before. There are plenty of differences under the hood, but the most important one for building an academic website is that Hugo integrates nicely with the blogdown R package, letting you write your website entirely in R. I chose Jekyll over Hugo because I liked the Jekyll theme better than the Hugo one. My life might have been easier if I’d gone with Hugo and blogdown, but here we are. Consequently, this tutorial will show you how to set up an academic website using Jekyll.
GitHub
The first thing you need to do is create a GitHub account if you don’t already have one. If you do have one, great! If you don’t already have an account, think about your username carefully. Unless you set up a custom domain name (which we’ll cover in a separate post), your website’s URL will be <yourusername>.github.io. Setting up a custom domain name is a little trick and isn’t free, so pick a username that works as a URL as well.
Git-speak aside: the basic unit of GitHub is the repository. Repositories are just folders (directories, if you want to be pedantic), but Git keeps a record of the files in the folders. We’ll start by making a repository on GitHub and then later download that repository to our computer. In both cases, it’s just a folder. The magic of Git is that we can link the two so that changes you make in your local repository (the one on your computer) will sync with the remote repository (the one on GitHub). When people (myself included) get lazy, they’ll often shorten repository to ‘repo’.
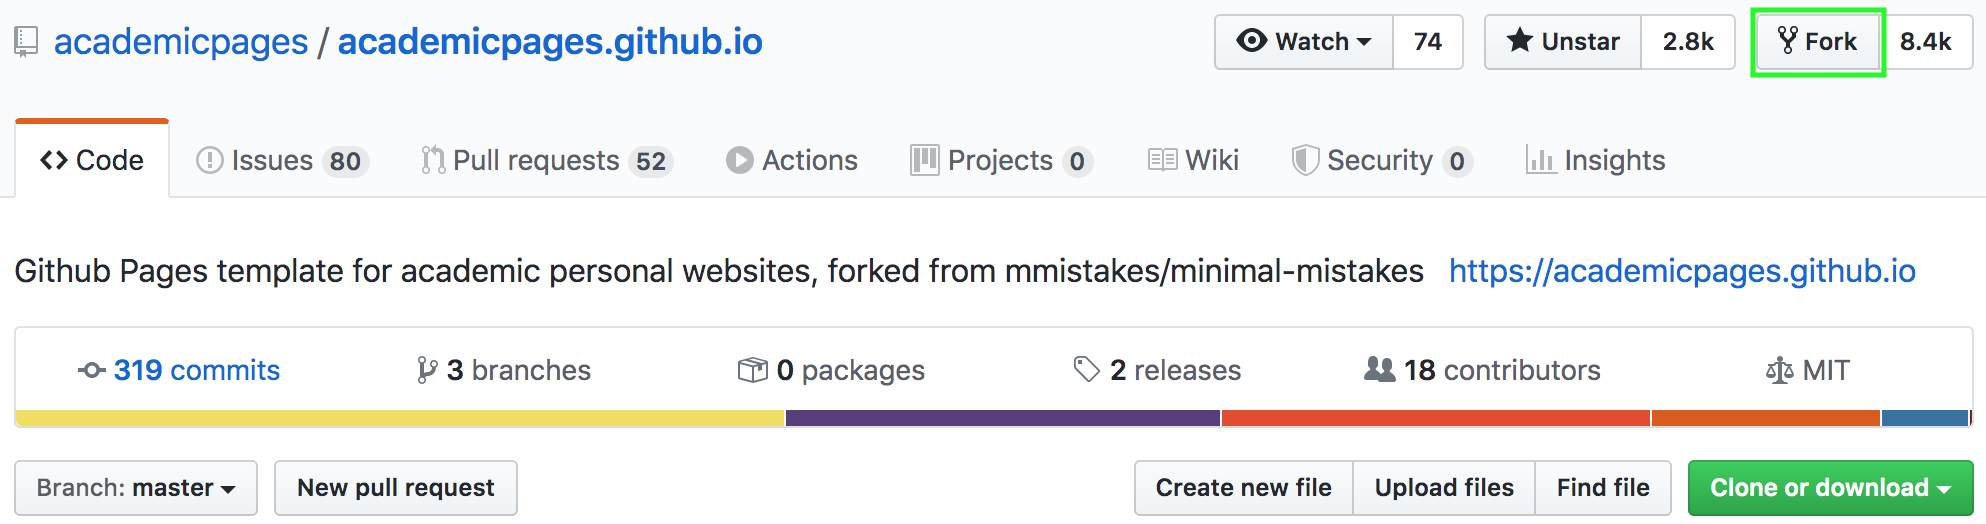
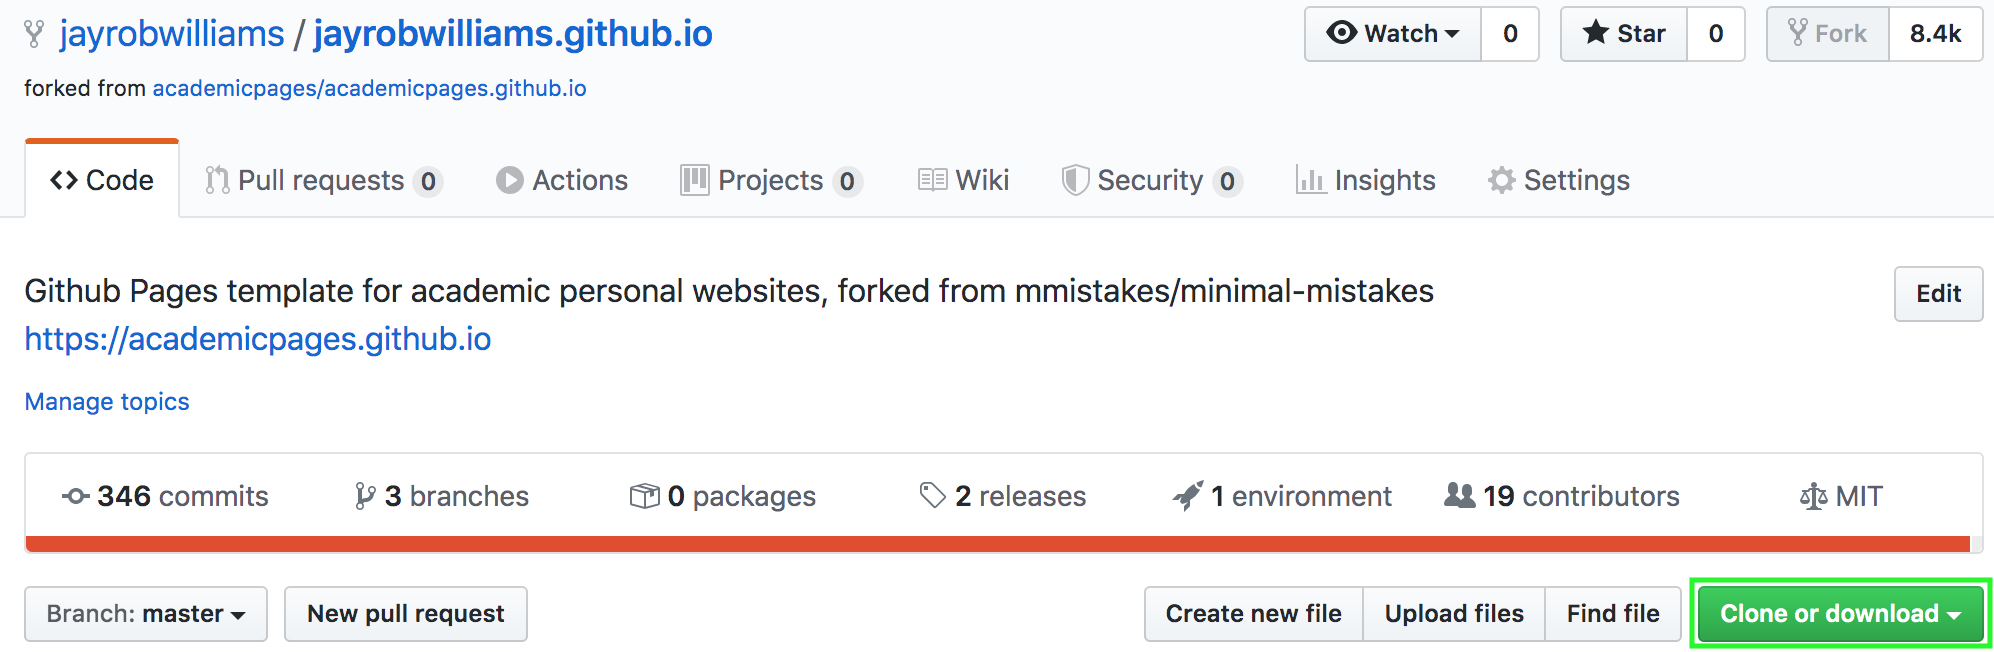
Once you’ve logged into GitHub, the next step is to head over to the repository for the template we’ll be using. We need to copy the template so we can get our own version that we can mess around with. In GitHub parlance we need to fork the template repository to get our own copy. Find the Fork button at the top right of the template repository (highlighted in green below), and click it.1
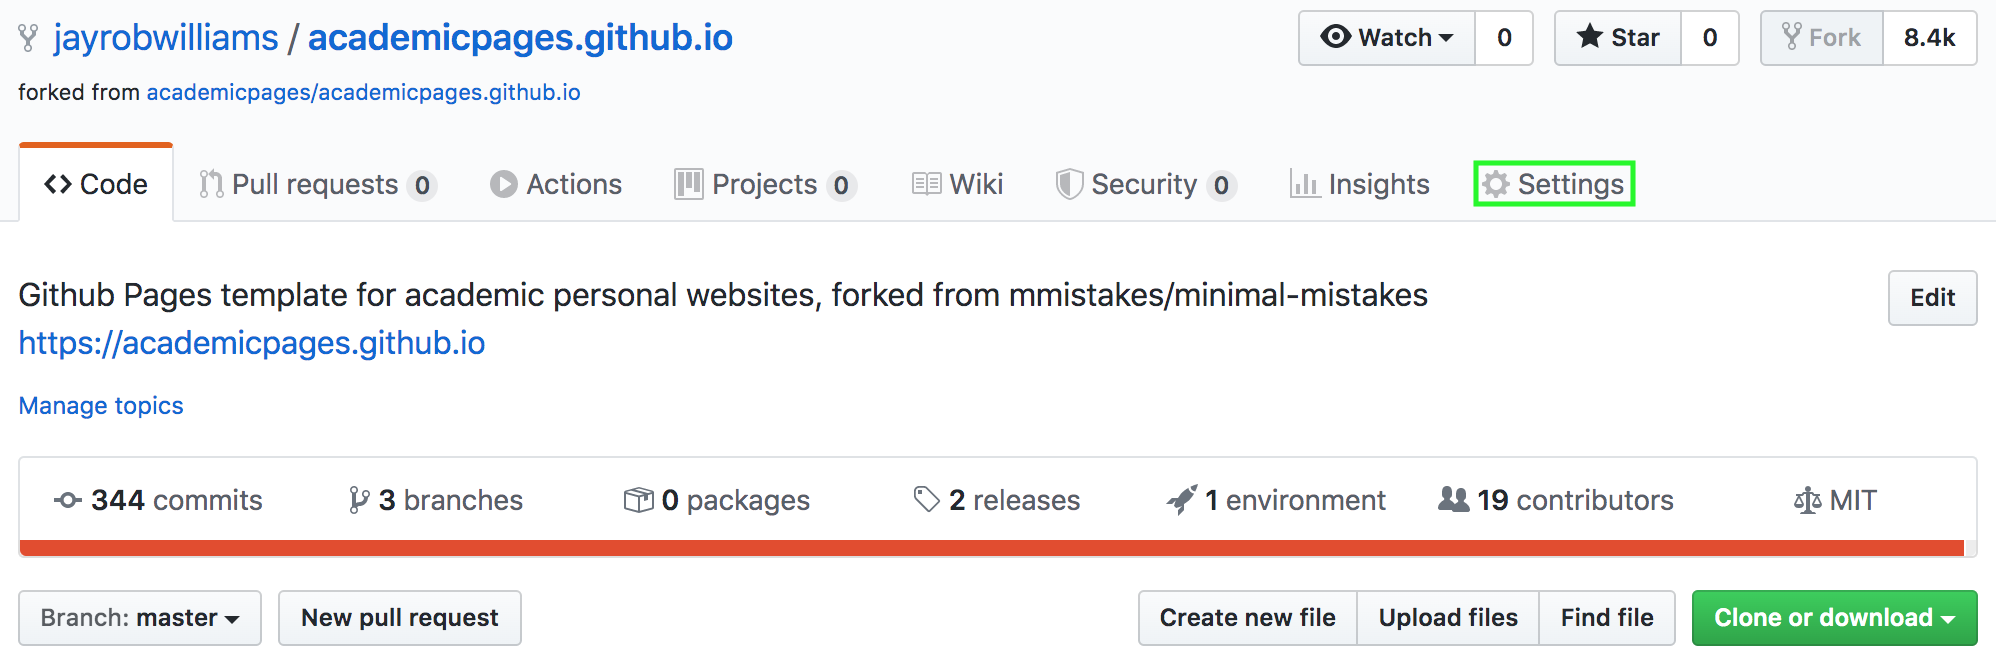
After a brief wait (and an amusing GIF), you’ll land at your forked copy of the repo. If you look closely, you’ll notice that the name in the top left has changed. Where it originally said “academicpages/academicpages.github.io” it should now read “<yourusername>/academicpages.github.io”. As you can see below, for me this is now “jayrobwilliams/academicpages.github.io”. We need to change this! Not just so people know that this is your website, but to get it online. Click the Settings button with the icon (highlighted in green below).
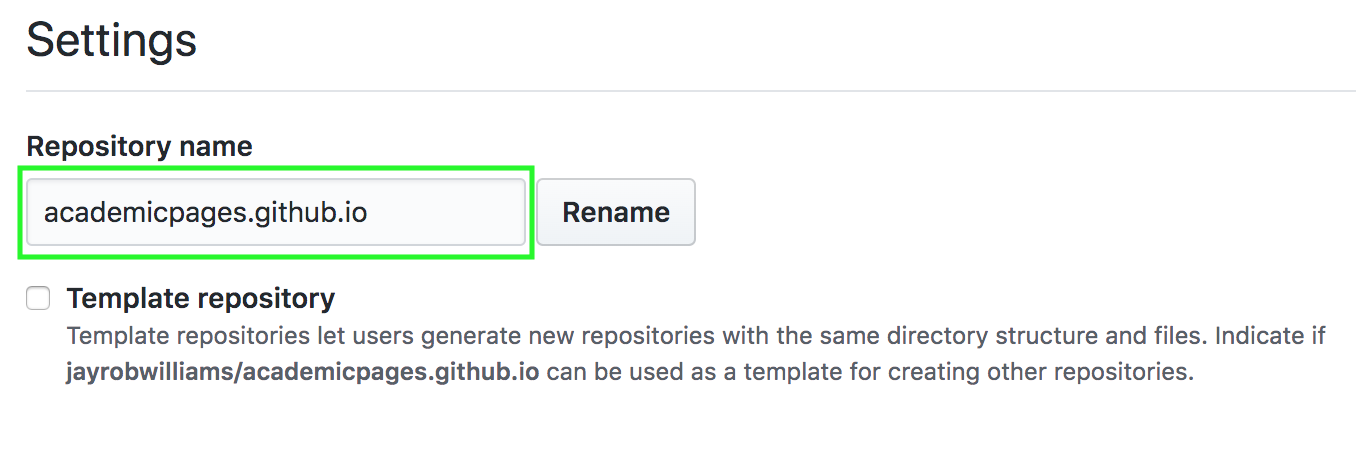
This will, unsurprisingly, take you to the Settings page. The very first option (highlighted in green below) is the repository name, and that’s all we need to worry about now. It should look like this, with <yourusername> in place of jayrobwilliams before the .github.io. Now, we need to change the repository name to <yourusername>.github.io. It’s important that the first part of the repo name exactly match your GitHub username, or you’ll run into trouble later when putting your website online.
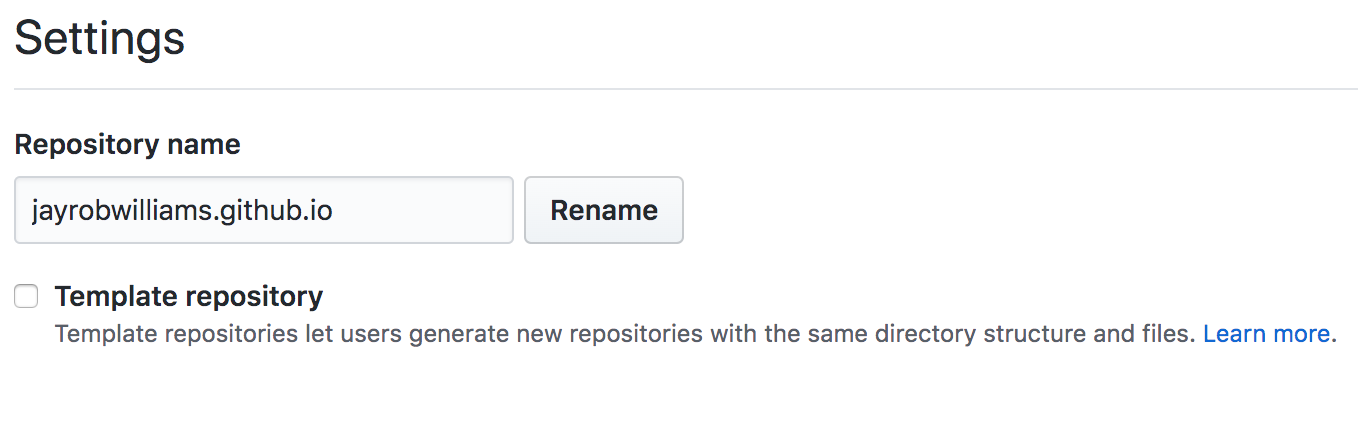
In my case, I renamed the repo to “jayrobwilliams.github.io” because my GitHub username is jayrobwilliams.
We’ve told GitHub that this repository is for our website, so now it’s time to start working on that website. To do that, we need to get the files for our website into our computer.

Git
Since we’re going to host our website on GitHub, you’ll need to make sure you have Git installed. Git is a version control system designed to let teams of programmers collaborate on projects seamlessly. For us, it’s just going to be the way that we upload files for our webpage to GitHub. You can download Git from the official downloads page, but there are a couple of easier ways. If you’re on MacOS, you can install Git via the Xcode Command Line Tools by running
xcode-select --install
This has the advantage of also installing a Ruby development environment, which we’ll need later. If you’re on Windows, you should download Git Bash. While the Git you’ll get from the official website will work just fine, Git Bash emulates a Unix terminal, meaning that you’ll use Unix commands instead of the Windows commands you’d use in cmd.exe. Why is this useful? I use MacOS and Linux, so this tutorial is written from that perspective. Beyond my laziness in not providing the equivalent Windows commands alongside the Unix ones, most Git related information you’ll find online at places like Stack Overflow will be written for a Unix audience. By using Git Bash, you’ll be able to follow any advice you find and not have to translate it into Windows commands. Most (all??) Linux distributions ship with Git, so you should be good to go if you’re using Linux.
Now that you’ve got Git, you can download the files that will make up your website to your compute. To do that, we’ll clone the repository from GitHub to our computer.
Git-speak aside: cloning a repository means creating a local repository (folder) on your computer that’s connected to the remote repository (on GitHub). Cloning differs from downloading in that you are setting up a connection between the two folders so you can keep changes you make locally synced up with the remote repository (which is where GitHub will build your website from).
Find the green Clone or Download button on the right side of your repository’s page (highlighted in green below). When you click it, a dialog will pop up that contains the URL you will use to clone your repository to your computer. Click the clipboard icon to the right, and the URL will be copied to your clipboard.
Once you’ve done that, open a terminal and navigate to where you want your website’s folder to live. I keep mine at the top level of my Dropbox, so I would type
cd ~/Dropbox
to navigate there. Use the pwd command to verify you’re in the right place; if you’re also putting your website at the top level of your dropbox, the output should be /Users/<yourusername>/Dropbox/. Now it’s time to clone our GitHub repo to our computer and create our local repo.
Do this by typing
git clone https://github.com/<yourusername>/<yourusername>.github.io.git
and running it. This will create a folder called <yourusername>.github.io, which is honestly kind of clunky and not instantly informative when you’re scanning through your files. To give it a more informative name e.g, Website, run
git clone https://github.com/<yourusername>/<yourusername>.github.io.git Website
Adding Website at the end will clone the GitHub repo into a folder called ‘Website’ instead of <yourusername>.github.io.
Making it yours
Now that you’ve got all the files needed to build your website on your computer, it’s time to start personalizing this generic template!
Editing pages
All of the actual content of your site is contained in .md files, which are Markdown files. Most of these files live in the _pages directory. The documentation that comes with the template is relatively straightforward, and does a pretty good job telling you how to customize your site. For example, the landing page can be changed by editing the _pages/about.md file and the sidebar information is controlled by the _config.yml file. Let’s start by editing _config.yml to rename put our name on the site and change the sidebar to reflect our information.
I’ve copied the first several lines of _config.yml below:
# Welcome to Jekyll!
#
# This config file is meant for settings that affect your entire site, values
# which you are expected to set up once and rarely need to edit after that.
# For technical reasons, this file is *NOT* reloaded automatically when you use
# `jekyll serve`. If you change this file, please restart the server process.

# Site Settings
locale                   : "en-US"
title                    : "Your Name / Site Title"
title_separator          : "-"
name                     : &name "Your Name"
description              : &description "personal description"
url                      : https://academicpages.github.io # the base hostname & protocol for your site e.g. "https://mmistakes.github.io"
baseurl                  : "" # the subpath of your site, e.g. "/blog"
repository               : "academicpages/academicpages.github.io"
teaser                   :  # filename of teaser fallback teaser image placed in /images/, .e.g. "500x300.png"
breadcrumbs              : false # true, false (default)
words_per_minute         : 160
future                   : true
read_more                : "disabled" # if enabled, adds "Read more" links to excerpts
talkmap_link             : false #change to true to add
You’ll want to change the following things:
"Your Name / Site Title"to your name&name "Your Name"to your namehttps://academicpages.github.ioto the name of your repository (and also your github username) i.e.,https://<yourusername>.github.io"academicpages/academicpages.github.io"to your GitHub username and the repo name i.e.,"<yourusername>/<yourusername>.github.io"
When you’re finished, it should look like this:
# Welcome to Jekyll!
#
# This config file is meant for settings that affect your entire site, values
# which you are expected to set up once and rarely need to edit after that.
# For technical reasons, this file is *NOT* reloaded automatically when you use
# `jekyll serve`. If you change this file, please restart the server process.

# Site Settings
locale                   : "en-US"
title                    : "<Your Name>"
title_separator          : "-"
name                     : &name "<Your Name>"
description              : &description "personal description"
url                      : https://<yourusername>.github.io # the base hostname & protocol for your site e.g. "https://mmistakes.github.io"
baseurl                  : "" # the subpath of your site, e.g. "/blog"
repository               : "<yourusername>/<yourusername>.github.io"
teaser                   :  # filename of teaser fallback teaser image placed in /images/, .e.g. "500x300.png"
breadcrumbs              : false # true, false (default)
words_per_minute         : 160
future                   : true
read_more                : "disabled" # if enabled, adds "Read more" links to excerpts
talkmap_link             : false #change to true to add
This will put your name on the website and tell GitHub where to look for the files that make up your site. Now let’s check out our changes and make sure everything’s working like it’s supposed to!
Previewing your website
Once we upload our modified files to GitHub (and tell GitHub to turn them into a website, which we’ll cover below), they’re out there on the internet for everyone to see. If you’re like me, you’ll make a lot of mistakes when working on your website. There’s no need to broadcast all of those mistakes to the world, and we can avoid this very easily by previewing our website locally. What this means is building the site from the various .md files, rendering it to HTML, and then viewing it. We can do all of that on our computer without ever having to put it online.
To preview your website locally, you’ll need to install Jekyll on your computer. The easiest way to do this is with Bundler. Bundler is a package manager for Ruby, which is the programming language that Jekyll is written in. This means that we need a full Ruby development environment to get Jekyll working to run our website locally. If you’re on Windows, RubyInstaller will give you everything you need. If you’re on MacOS, your computer comes with Ruby, but not the development headers required for Bundler to work. If you installed Git via the Xcode Command Line tools earlier, you’re good to go here. If not, you can install Ruby Ruby via Homebrew with
brew install ruby
If you’re on Linux, just install Ruby via your package manager. Once that’s taken care of, it’s time to install Bundler. Do so by running
gem install bundler
in a terminal. If you’ve navigated away from the directory where your website is located (which is ~/Dropbox/Website for me), head back there now. Do this with
cd ~/Dropbox/Website
but replace ~/Dropbox/Website with the path to your website’s repo. Next, we need to install any packages (called ‘gems’ in Ruby) that Jekyll depends on. This is where Bundler shines by taking care of this whole process for us; it reads the Gemfile included with the source code and installs all required gems
bundle install
If you want to see what’s been installed, run gem list before and after bundle install. If everything worked correctly, you can now launch your website! What we’re going to do is start a webserver on your computer, which will let you access your website locally without having to put it out on the internet. We do this with
bundle exec jekyll serve
The bundle exec command is just a prefix that lets ruby access all of the gems specified in the gemfile. The jekyll serve command builds your website and starts a webserver so that you can view it locally. To access your website, open a browser and go to 127.0.0.1:4000 or localhost:4000. It should look exactly like the example site.
This is a special version of your site that’s only accessible from your computer; no one else can see it! So this is the perfect place to play around, experiment, and see how to make your site do what you want it to. This process is surprisingly easy. Make a change to a file e.g., editing _pages/about.md to introduce yourself, and save the file. That’s all you have to do; Jekyll will notice the change to the file and automatically rebuild the site. All that’s left to do is refresh your browser so you can see the changes!
Once you’ve made a couple changes to see how it works, you might want to turn off the webserver and make lots of changes, then check out your handiwork. Or maybe you’re just done working on your website for now. Either way, it’s time to shut down the webserver. To do so, you can just close the terminal window, but you’ll get a warning like this.
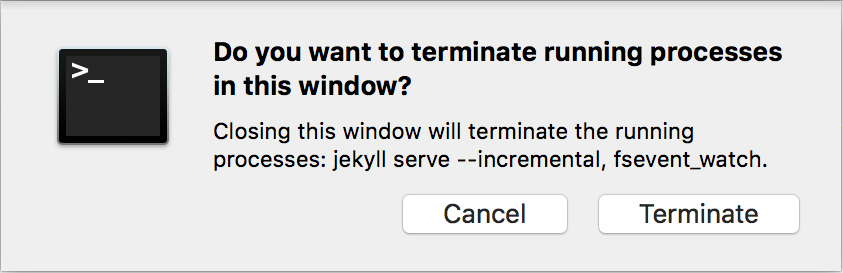
To save yourself some time and do this faster, simply press Ctrl+c.2
Getting online
Alright, you’ve made some changes from the template, checked them out locally, and you’re ready to share your website with the world. This is a two step process. First we need to upload all of our modified files to the GitHub repo we forked from the template. Then we need to configure GitHub Pages to build and deploy our website. Finally, if you want a custom domain name, we need to do some configuration outside of GitHub Pages to connect your domain name with your website.
Uploading changes to GitHub
To upload your changes to GitHub, we first have to make Git locally aware of them. We do this by committing the changes, then pushing them to the repo on GitHub
Git-speak aside: Git stores file histories as a series of changes or differences. A batch of changes (which can include changes in one or more files) is called a commit. When you want to tell the remote repo (the one on GitHub) about changes you’ve made, you push a commit from the local repo to the remote one. Once you do this, GitHub looks at the differences and modifies the files in the remote repo.
Before we can commit the changes, we need to stage them. This just involves telling Git what changes we want to commit. To make our lives easier, let’s check in on what changes we’ve made
git status
You should get results that look something similar to this:
On branch master
Your branch is up to date with 'origin/master'.

Changes not staged for commit:
  (use "git add <file>..." to update what will be committed)
  (use "git checkout -- <file>..." to discard changes in working directory)

	modified:   _config.yml

Untracked files:
  (use "git add <file>..." to include in what will be committed)

	Gemfile.lock

no changes added to commit (use "git add" and/or "git commit -a")
We can ignore the first part for now. The second part (Changes not staged for commit) will list any files that Git knows about that have changed. The third part (Untracked files) includes files we haven’t told Git about, so as far as it’s concerned they don’t exist. I’ve edited _config.yml to replace the template’s information with my own, so it shows up here. If you want to verify the changes you made, you’ll want to diff the file. Do this with
git diff _config.yml
This is what the output looked like for me. Note that your output may or may not be color-coded depending on what type of system you’re on and your Git settings.
diff --git a/_config.yml b/_config.yml
index 1dc605c..4affb4e 100644
--- a/_config.yml
+++ b/_config.yml
@@ -7,13 +7,13 @@

 # Site Settings
 locale                   : "en-US"
-title                    : "Your Name / Site Title"
+title                    : "Rob Williams"
 title_separator          : "-"
-name                     : &name "Your Name"
+name                     : &name "Rob Williams"
 description              : &description "personal description"
-url                      : https://academicpages.github.io # the base hostname & protocol for your site e.g. "https://mmistakes.github.io"
+url                      : https://jayrobwilliams.github.io # the base hostname & protocol for your site e.g. "https://mmistakes.github.io"
 baseurl                  : "" # the subpath of your site, e.g. "/blog"
-repository               : "academicpages/academicpages.github.io"
+repository               : "jayrobwilliams/jayrobwilliams.github.io"
 teaser                   :  # filename of teaser fallback teaser image placed in /images/, .e.g. "500x300.png"
 breadcrumbs              : false # true, false (default)
 words_per_minute         : 160
Each line that begins with a + indicates an insertion and each line that starts with a - is a deletion. You can see that I’ve just replaced the generic information with mine. Now that we’re confident in the changes we made to _config.yml, we need to tell Git to record them. We first stage the file with
git add _config.yml
which stages the file. If we re-run git status, we’ll see
On branch master
Your branch is up to date with 'origin/master'.

Changes to be committed:
  (use "git reset HEAD <file>..." to unstage)

	modified:   _config.yml

Untracked files:
  (use "git add <file>..." to include in what will be committed)

	Gemfile.lock
You’ll notice that _config.yml has moved from Changes not staged for commit to Changes to be committed (Changes not staged for commit has disappeared since we haven’t made any changes to other files that Git is tracking). Now we’re finally ready to commit our changes!
git commit -m "add my info to config file"
This tells Git to record the changes we made to _config.yml. The -m "add my info to config file" is the commit message for this commit.3 You should see something like this, but with a different number after master on the first line.4
[master a8af7b1] add my info to config file
 1 file changed, 4 insertions(+), 4 deletions(-)
That means our changes have been recorded locally by Git. Once we’ve committed our changes to _config.yml, it’s time to upload them to GitHub! We do this by pushing the changes to GitHub, which will then modify its copies of the files to match ours. This is (relatively) straightforward
git push
Git will then prompt you for your username and password.5 This will be your GitHub username and password. Enter each of them and you should be good to go! If everything goes smoothly, you will see a message something like this
Enumerating objects: 9, done.
Counting objects: 100% (9/9), done.
Delta compression using up to 4 threads
Compressing objects: 100% (5/5), done.
Writing objects: 100% (5/5), 426 bytes | 426.00 KiB/s, done.
Total 5 (delta 4), reused 0 (delta 0)
remote: Resolving deltas: 100% (4/4), completed with 4 local objects.
To github.com:jayrobwilliams/jayrobwilliams.github.io.git
   83c3bc4..a8af7b1  master -> master
This is just Git telling you exactly how it recorded the changes and uploaded them to GitHub, the content of it doesn’t matter and you can ignore it. If things don’t go smoothly, you may get an error that looks something like this
fatal: No configured push destination.
Either specify the URL from the command-line or configure a remote repository using

    git remote add <name> <url>

and then push using the remote name

    git push <name>
Your repo on github is the “remote” that your local Git needs access to. To fix this error, we just need to tell Git where to find the remote
git remote add origin https://github.com/<yourusername>/<yourusername>.github.io.git
git push -u origin master
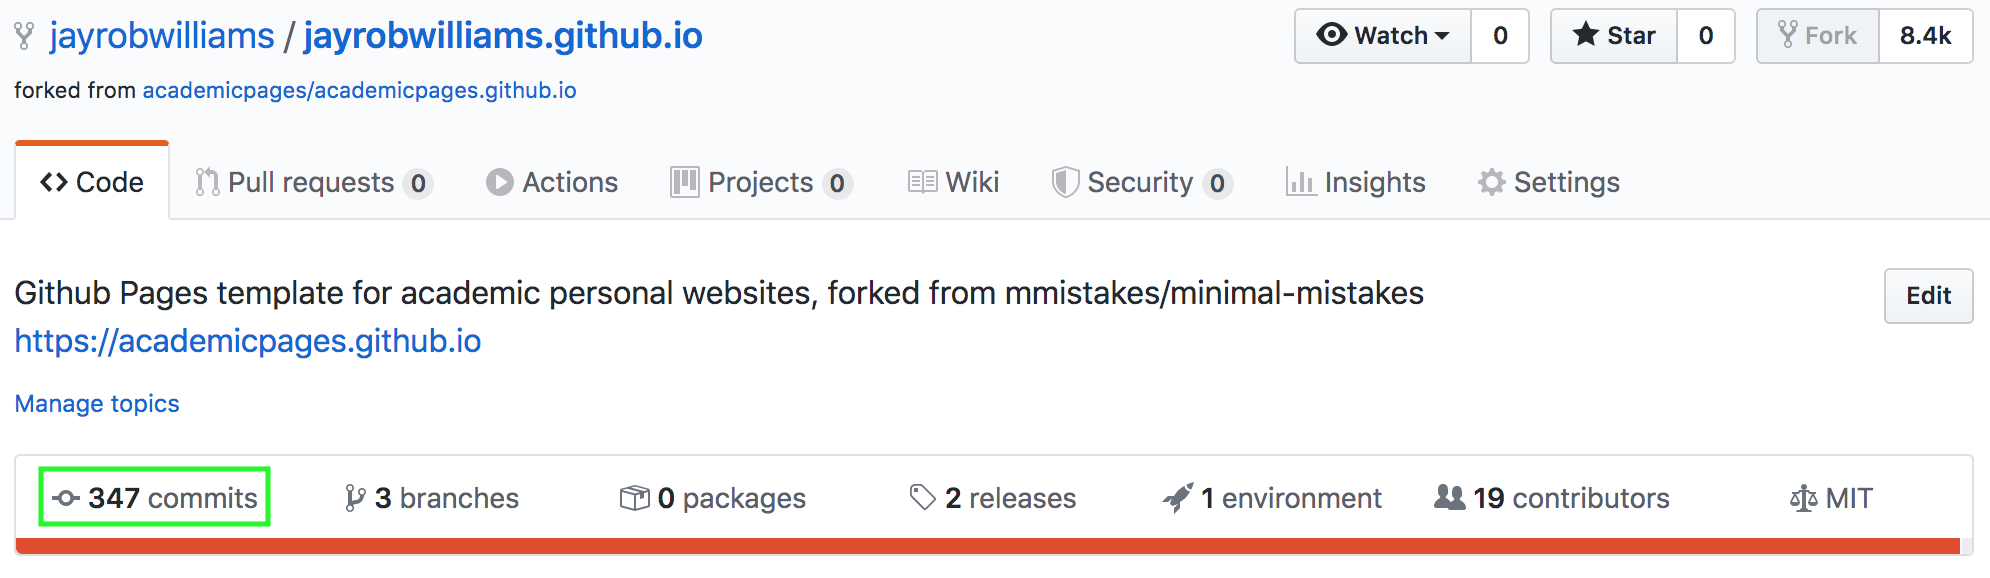
The next step is to go to GitHub and check our your changed file. Head back to your repository (https://github.com/<yourusername>/<yourusername>.github.io, as a reminder) and click the commits button at the bottom left (highlighted in green below).
On the commits page, you should see the commit you just made
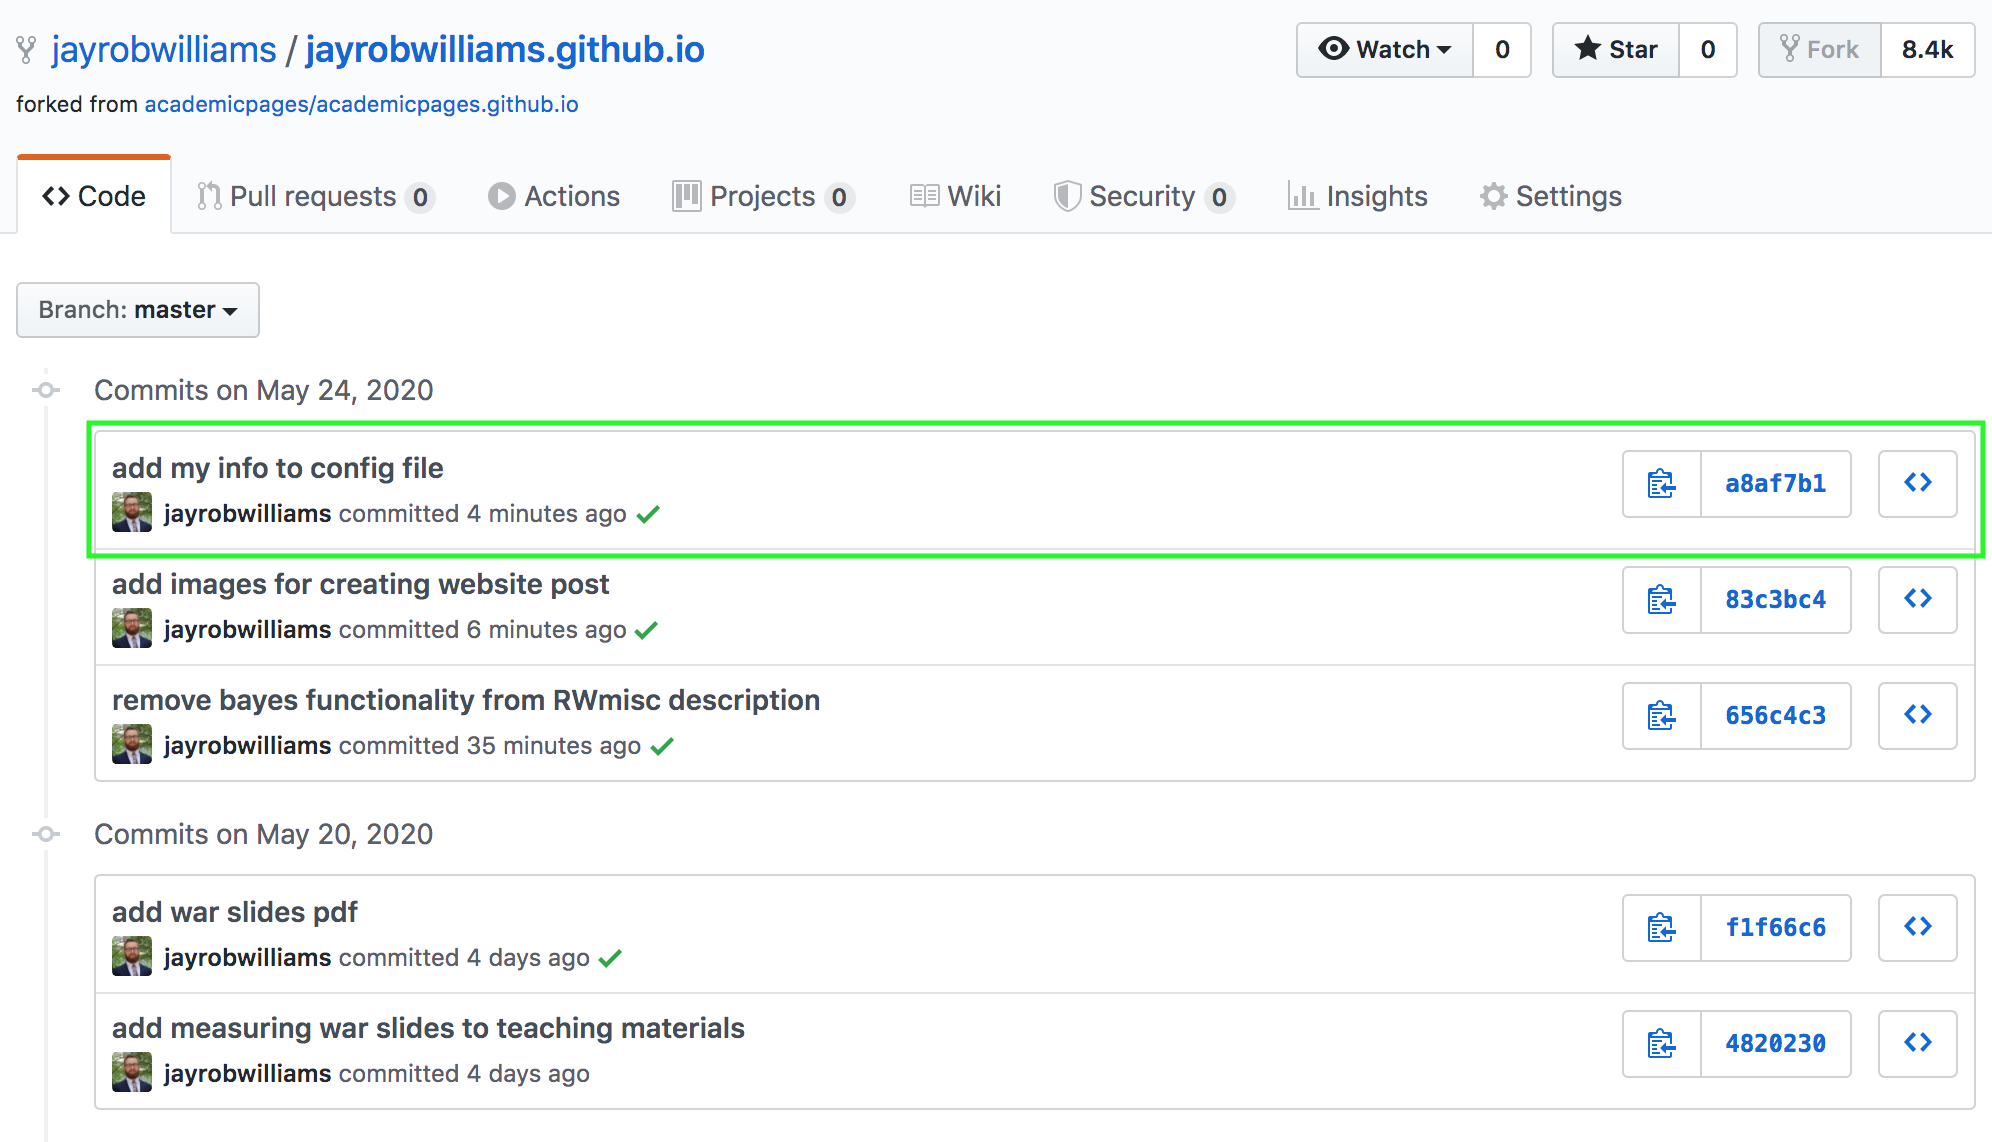
If you do, then you’re all set.
Going live
All that’s left to do now is take our website live. If using git on the command line has been stressing you out, you’ll be glad to know that this part happens entirely in your browser.

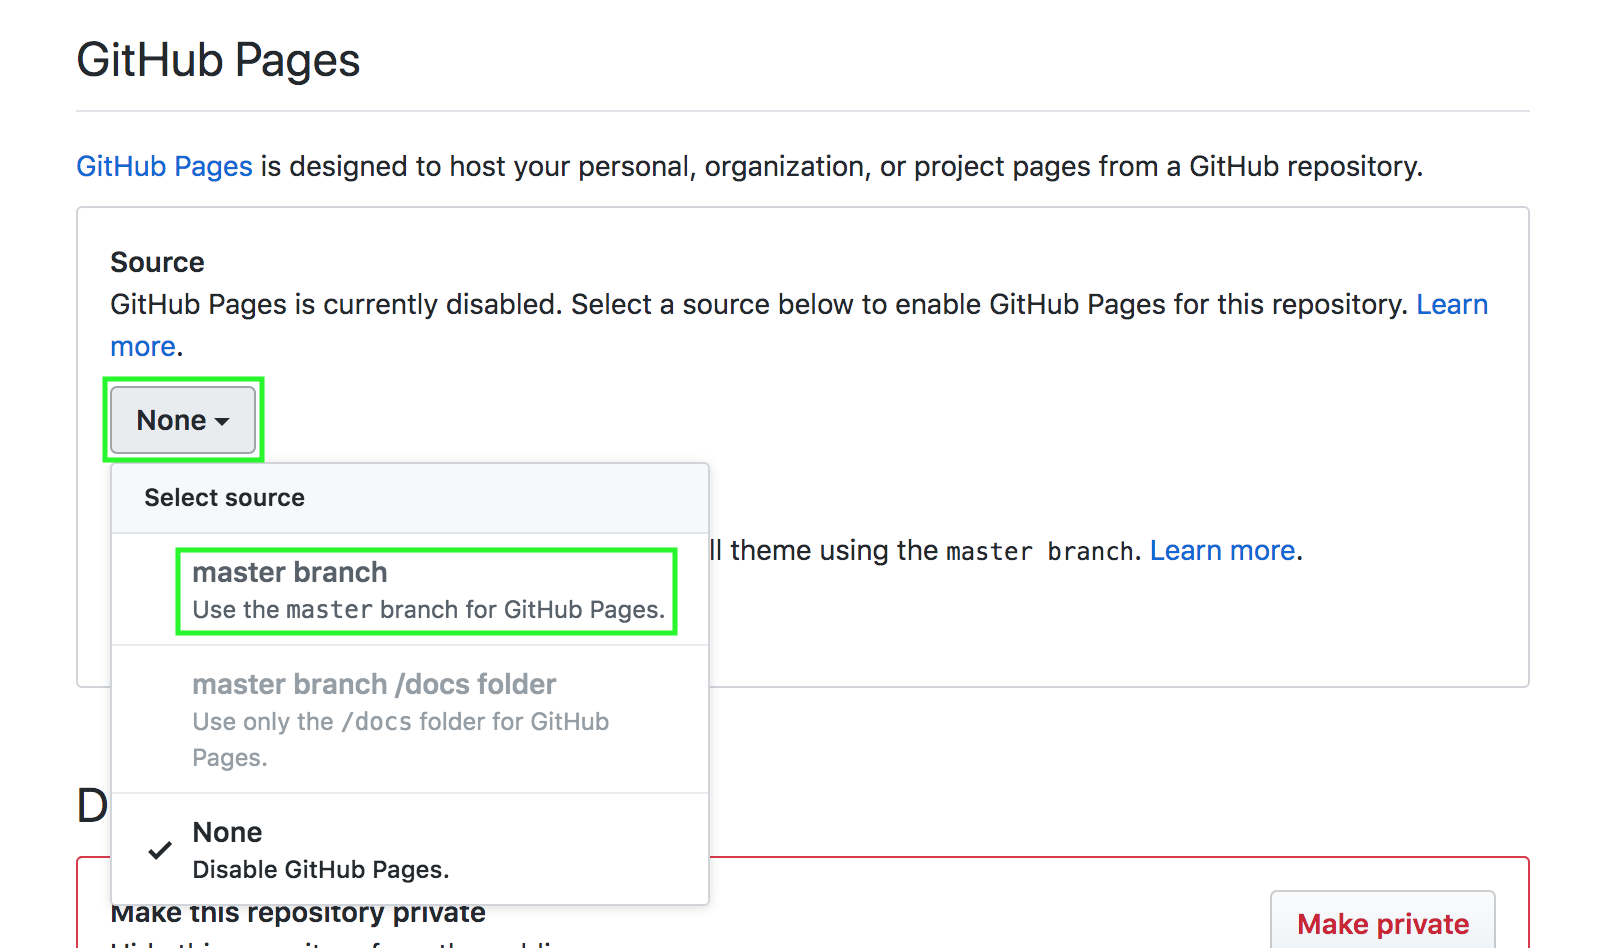
You want to go back to the settings page for your repo (the button with the at the top right of the page) since that’s where we’ll turn this collection of files into a website. Scroll down until you get to the GitHub Pages section Click the dropdown currently labeled “None” under the “Source” subheading, and choose “master branch” from the popup (highlighted in green below).6
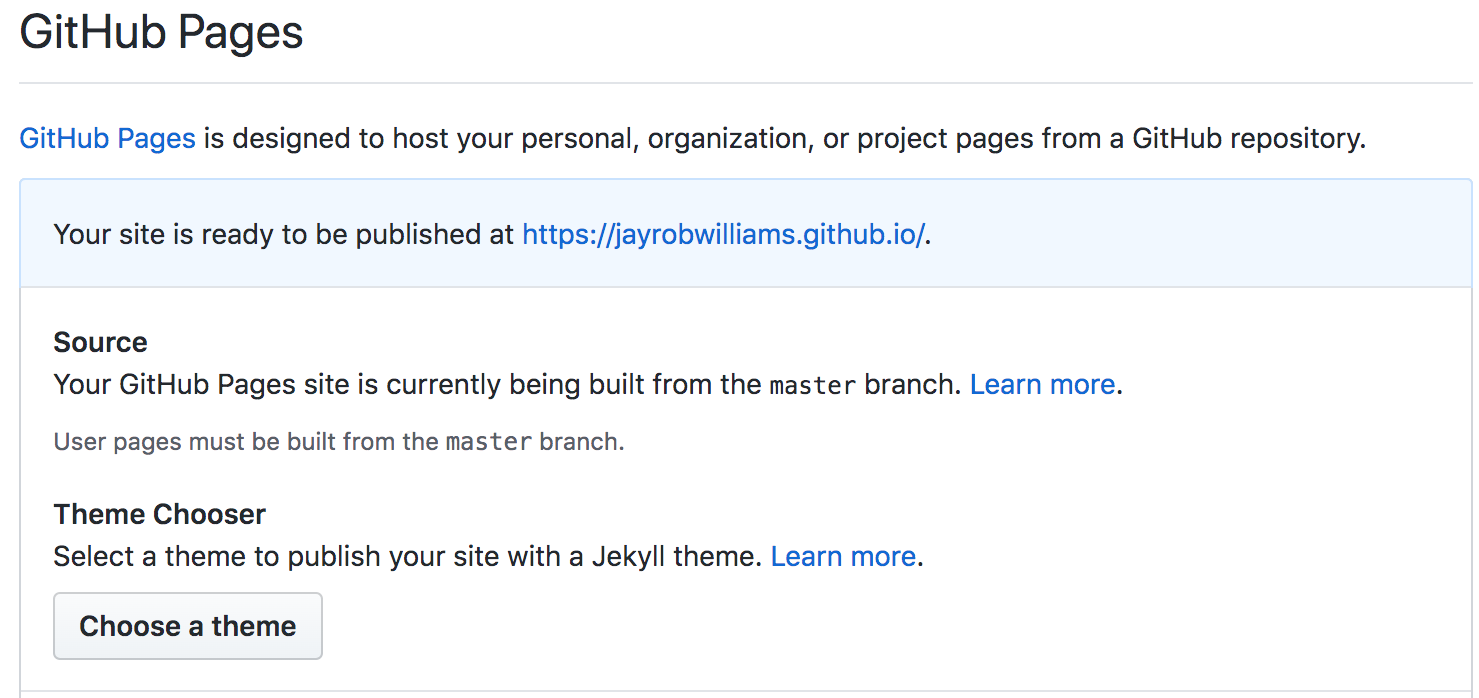
Once you do this, the page should reload. Scroll back down to the “GitHub Pages” heading, and there should be a message at the top that “Your site is ready to be published at http://<yourusername>.github.io/”. You can see what this looks like for me below
Now, here’s where things may get a little tricky. Go to http://<yourusername>.github.io/ and see if there’s a website there. If there is, skip down to the last section below. If not, go back to the settings page for your repo and see if there’s still a “ready to be published” message. If there is, you may have to push an additional change to the repo to trigger building your site. Editing _pages/about.md to personalize the welcome message and short biography is a good candidate here. Once you’ve personalized your site’s landing page, record the changes and push them to the repo
git add _pages/about.md
git commit -m "edit welcome page"
git push
Then head back to the repo’s settings page and see if the “ready to be published” message has changed to “ Your site is published at http://<yourusername>.github.io/”. You can see what this looks like for my website below
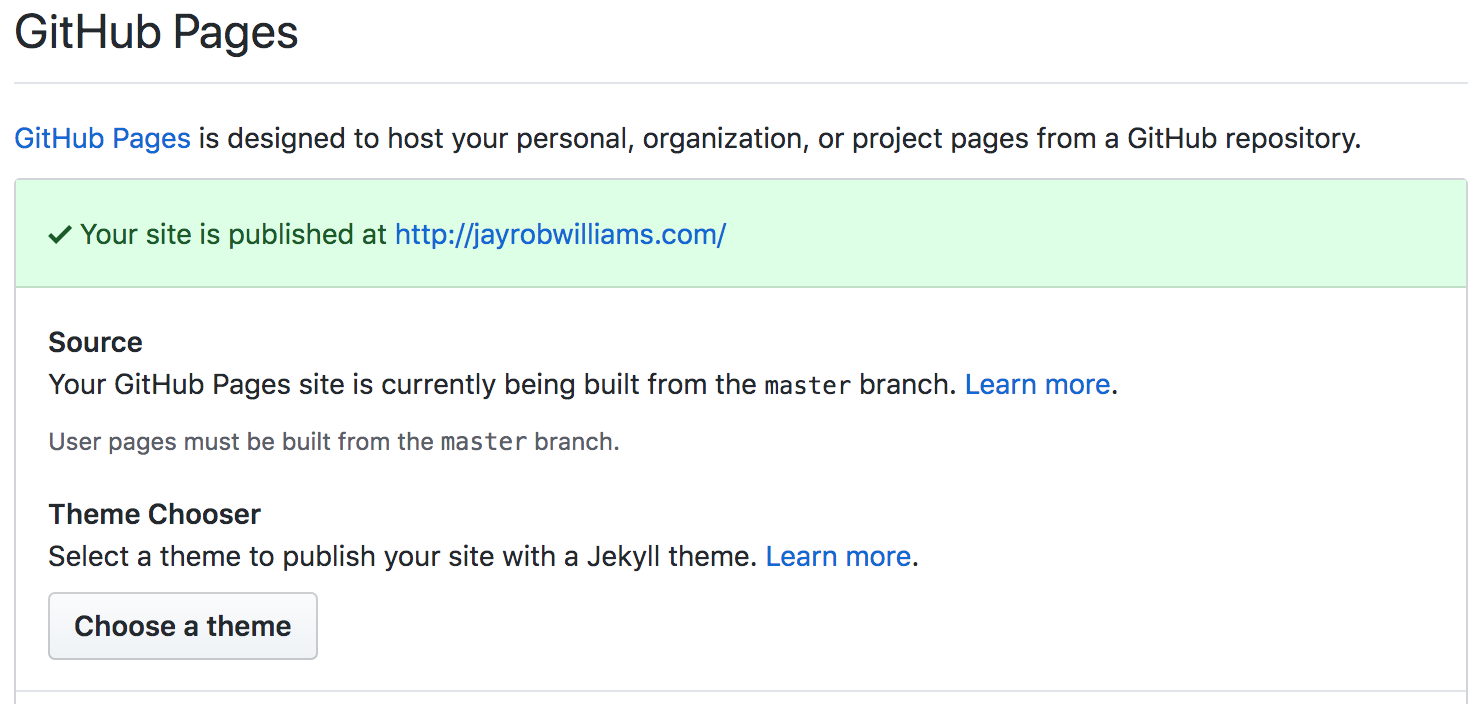
You’ll notice that the URL for my site is http:/jayrobwilliams.com, not http:/jayrobwilliams.github.io. That’s because I’ve bought a custom domain name for my site. While this does make your website seem slightly more profession, it’s not free (unlike .github.io) and it can be a little tricky to set up. I’ll cover how to get a custom domain name for your site in a future post.
Next steps
Congratulations! You now have a professional looking academic website that’s yours forever; you won’t lose access to it when you leave your current institution. At this point you should continue making it your own by adding information on your research projects (edit the .md files in _portfolio folder to have them populate the Portfolio page with information on each of your research projects), teaching experience (_pages/teaching.md), and accomplishments (_pages/cv.md). Remember that you can preview any changes locally with bundle exec jeykll serve. If you add any new files, like PDFs of your working papers or publications, be sure to git add them as well, so that they’ll be uploaded to your repo with the next git push. You may have noticed that there are lots of small differences between my website and the template, and not just in terms of content. In a future post, I’ll talk about how to further customize the look of your site to make it feel more unique.
GitHub might look a little different for you since it recently went through a redesign. Everything you’re looking for is still there and should be recognizable from the images. ↩
Yes, even if you’re on MacOS; Ctrl+c has been the way to cancel programs on the command line since the 1960s while the ⌘ key did not exist on computers until the Macintosh in 1984, and the terminal is olddd. ↩
Yes, you can omit the
-m "..."withgit commit, but it will open up your system’s default editor (likely vim, emacs, or nano), none of which are remotely beginner-friendly. Until you decide to learn one of them,git commit -mis perfectly fine. ↩This is the hash for the commit; it’s a 40 digit string that uniquely identifies the changes that you’re committing. This is useful if you want to retrace your steps or undo things in the ↩
If you’ve set up SSH authentication for GitHub, then you won’t be prompted to enter your credentials. ↩
Ignore the “Choose a theme” button; it’s for use with bare bones GitHub pages sites and the academicpages template supplies all the components for its theme. ↩